Showing posts with label living. Show all posts

Thursday, May 17, 2012

Armchairs, Part One: Strip and Stain

So I've been planning on redoing our living room armchairs since we got them. I love the shape of these, but I really don't know anything about them. The brown vinyl is really not my thing though. It also has some nicks in the vinyl and odd black staining on the seat of one of the chairs. Initially I wanted to have them professionally reupholstered, but then we had some unexpected expenses (*cough*stupidmoneypitcar*cough*) and there went my chair upholstery fund.

Then I realized I could just paint them with vinyl spray paint. It would help fill in the nicked areas, since it contains actual vinyl particles in it. And it's way cheaper, at least for now. Except then my white vinyl spray paint was out of stock on Home Depot's website (the only place I could find it that wasn't ridiculously overpriced). Now it's discontinued. Seriously?

But I decided I didn't want to paint them white anyways. I think I want a light sandy beige, because I'm going for this natural sort of neutral thing in the living room now. Since vinyl spray paint is generally used for automotive and boat upholstery, it tends to come in a lot of shades of tan, so that should make it easier to find the particular shade I want.

Still haven't actually gotten the paint, but I had to strip and restain the arms first anyways. Which is really the point of this post. The arms were also not in the greatest shape: some mystery paint on the legs, along with a weird and obviously intentional pictogram thingy scratched onto the arm of one chair. And a somewhat garish orange tone that really didn't work well with the 70's drab brown vinyl.

Before
So I stripped them, which didn't end up doing a whole lot, then sanded them down with a mouse sander using a medium grit then a fine grit sandpaper. This was definitely the most time consuming part, due to the serpentine shape of the wood. I actually really liked the bare wood, and if I were keeping the brown or going with a darker color for the upholstery, I would have simply treated it with some oil and been done with it.

Stripped and sanded
The rest was pretty straightforward. Treat with wood pre-conditioner (this is to help the wood stain evenly), allowing the wood to absorb for 5-15 minutes. Afterwards you are supposed to wipe off any excess with a rag, but the wood completely absorbed the two coats I put on.

After wood conditioner.
Then three coats of stain, wiping off any excess with a rag. If I want it darker, I can apply more stain. I used a roughly 1:1 ratio of Minwax Dark Walnut and English Chestnut. I thought it would have more of a red tone to it with the English Chestnut, but it really didn't seem to pick up much at all. That's okay though. I like how it looks.

Stained
And the grain really came out pretty lovely in some spots.

Grain

Tuesday, April 24, 2012

Fireplace Renovation, Finale.

We finished this a couple weeks ago, but I'm just now getting around to posting. Lots of stuff going on around here lately, including my mother moving in for a couple weeks since she's about to close on the contract to sell her house, and us ripping out nearly all the landscaping in the front yard to redo it (which I will get around to posting pictures of soon, hopefully). Oh and it's my last semester of undergrad. Yeah, sh!t's been insane.
Before. Not terrible, just kinda boring.
After trying to remove the paint. The orange tint is dried on Citristrip.
Down to the frame.
New MDF, before we decided to replace the tile also. Legs are 1.5 inches wider on each side.
Mantle #1. I hated it, the proportions were wrong. And it was ugly.
New 2" x 2" travertine mosaic tile.
Tile after grouting.

Using painters tape to decide if I wanted to do detail trim on the front.

Finished fireplace!

Ta-da! Sure it took 5 months instead of two weeks, but overall I'm really happy with how it turned out.

Sunday, December 18, 2011

Fireplace, Part One, or To Create We Must First Destroy.

So, here's what the fireplace used to look like (circa Xmas 2010):
Originally the fireplace was painted the same yellow-beige as the rest of the trim. Hubby painted it with white gloss latex, along with the rest of the trim in the living room.

And now:
Well, we decided we wanted to strip the latex off and repaint all the trim in the house with oil instead, and the trim painting project got put on hold for 18+ months....

So one day a few months ago, I thought to myself, what would make a good day project? Stripping the fireplace.

Only this is what I had after six hours of stripping:
It was a total nightmare. The Citristrip kept drying out and nothing wanted to come off. I even tried using the highly toxic conventional stripper, with the same results. I draped a plastic drop cloth over it to keep the stripper from drying out, and it still wasn't working. Not to mention the stripper wouldn't come off either. HUGE FRIGGIN' MESS.

So the hubby ripped all the trim and MDF off. The plan: widen the frame by 2 inches on each side (to make the legs more proportional to the height), recover in new MDF, prime, paint, and make a new mantle. We will probably also replace the tile, either in something a little lighter or maybe matte black, probably subway tile.

As for the mantle, I'm thinking something like this one from The Lettered Cottage:
Although I really love this fireplace from Sweet Something Designs:
The clean lines are great, and I love how the fireplace acts as its own mantle, but we have no hearth and to make our fireplace that deep (and still functional) would be a huge project. Right now, after having to look at my fireplace in varying states of disaster for the last few months, I really just want to get this fixed quick and cheap.

Saturday, February 26, 2011

Living Room Updated.

Here's a shot of the living room with the new rug in it:
I think it looks awesome. We haven't put the dots down yet to make it "permanent", so I'll probably play with the pattern some more.

And here's the canvas I picked up. I painted it blue but haven't done anything else with it yet. Of course IKEA had to go out and update their stuff, and I saw a ready-to-hang canvas I really liked, but I think we'll stick with this.

Sunday, February 6, 2011

Finally Bit the Bullet.

I committed to a rug. The Power Nap samples were nice, but the lagoon color is a little too teal and the blues really run more towards cobalt and indigo. I just couldn't see it working as a solid colored rug with everything else in the room. I wasn't feeling the greys either. The Working Class samples were nice colorwise, but the texture was terrible (like a plastic felt). Great for a garage but not for a living space, despite what the catalog photos would like you to believe.

So I was playing around with the FLOR builder, and found something my husband and I both liked:
Feelin' Groovy in Lagoon, Cobalt, Blue Jay, Tidal, Sky, and Fog. It was more expensive than I really wanted, but I had to make a decision. Did I want to spend money on something I'd be only partially happy with, or spend a little more and not have to replace it all later on with something that fit better? I chose the latter. The color selection is awesome (82!) for this line of FLOR tiles, and the different blues should look really cool. And the best part is that it should really cut down on the cacophony of 12 little paws running back and forth on the laminate. I will of course post pictures of the real thing once it comes in.

Thursday, January 13, 2011

Friday, September 24, 2010

Thinking More About Living Room Art.

Been super busy with school.

I've mentioned previously about possibly using rasterbator to make a huge print. I did a mock-run of a picture by Nivbed. We used the free printing at school to do a black and white version. The scale is nice. It needed more contrast in the original, because it's very Monet, even on the other side of the room, although you can still discern what the picture is of. Also, it doesn't lay perfectly flat. I taped all the pieces together, and it didn't fit completely perfectly together and there are some crazy undulations. So it would have to be glued to the wall, or to something else which would then hang on the wall. I don't know if I want to commit that much.

You probably would like to see a a picture of the rasterbator mock up, but since I think it's sad and pathetic, I'm not gonna.

So here are some other options I'm considering:

1) Large frames with large white mats, small art.

I like this option because it's simple, clean, and graphic. And you can find nice pieces of art that are small (i.e. cheap) but still make them have a big impact. I would do three frames above our couch, since it's so long and odd numbers look better.

2) Plates!

I really love the different graphic colors. It would probably make more sense in the dining room, but the kitchen is adjacent to the living room also, and hey, they are there for art rather than function. I don't have any graphic plates though. UO has some neat ones I'm always eyeing. I could probably get some of the awesome melamine ones from Target (which I have never picked up because Plastic plates + hot food = no bueno) also for fairly cheap, but the price would still add up for the number I would need. I'm too impatient to go scrounging flea markets and Etsy for the next several years to create a vintage collection.

So that's that. Probably gonna go with #1, whenever I feel like dropping $60+ on frames. That doesn't include finding the art and then getting custom mats. I can always do the plate wall on the blank wall of our mini hallway.

*images are borrowed from Apartment Therapy posts.*

Thursday, August 5, 2010

Art on the Living Room Wall.

So, this is a bigger peek at the living room: the wall with the couch. I moved the coffee table out of the way, because it always looks so awkward in photos.


I was tired of the tiny lamps we had been using (and the fact they did not match stylistically at all).

I wasn't able to find affordable vintage lamps, so we bought new lamps from IKEA. I like them. They are simple, modern, and cheap. I want to add more of the blue-violet, as well as teal, turquoise, and possibly lime, in the way of throw pillows and art and a floor rug.

The art was stuff we just had lying around. I would prefer to get a new mat for the horse print, in blue. But for now it's nice to just have something up on the wall. I'm sure I'll take it down at some point. I've been contemplating two picture rails, the length of the sofa, to set art on instead.

Friday, July 23, 2010

New Mirror.

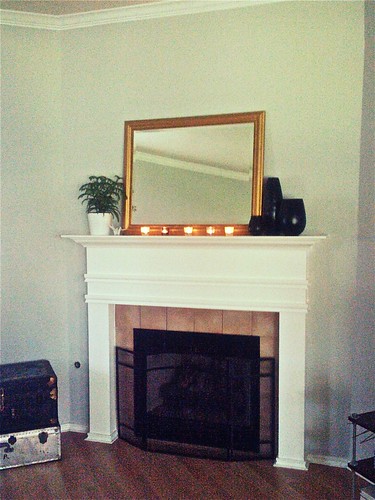
Our living room gets an abysmal amount of natural light. I knew I wanted to put a mirror somewhere, but I wasn't quite sure where. Originally I was leaning towards putting a floor length mirror on the short wall next to the fireplace, but then I'd need to find a new home for the trunks that are there now. I asked my husband what he thought, and he preferred above the fireplace instead of next to it.


I found this mirror at IKEA. I would have preferred the silver if they made it in that size, but I do like the antique gold. I think it looks really nice with the vases from West Elm I picked up after cashing in some points from my credit card.

I'm really rather happy with it. The fireplace is not my favorite thing in the house, simply because it's so traditional and we have more of a vintage/modern aesthetic, but I'm hoping once I get everything into the room it will flow better. The living room is far from finished. I need to find some art to hang above the trunks, and over the couch, as well as a rug, and new table lamps. And eventually re-upholstering the armchairs.